Atlassian's Confluence is a great tool for managing and sharing project documentation with your team and its seamless integration into Jira can help put everything into one place. We've used Confluence and Jira for almost all documentation, from general project docs, to How-Tos, and even New Hire Onboarding.
Recently I started going through the process of rewriting our training material for DevOps Engineers and found quite a lot of duplication in documentation. For some topics such as 'Git', Adobe Experience Manager, and other topics there were documents created for both front-end and back-end developers as well as Project Managers, QA Engineers, etc.
As I discovered all this duplication and extra work I thought, there has to be a better way, we have too many people creating and maintaining the same thing over and over with only slight variations. My first thought was to move common documents to a shared location and assign owners. This would enable different groups to cross-reference material already documented for their respective teams The dev team would own and be responsible for creating and maintaining 'git' and code related topics, the devops team would be responsible for topics on AEM setup, configuration, troubleshooting, etc.
While moving everything around in Confluence and assigning owners may help reduce the number of people updating documents, it doesn't solve the issue of ensuring the documentation fits the audience. Project Managers probably care very little about how to do a git merge and squash those commits, but may need to know general info, such as what git is, how it can be used on a project (without getting too far in to the technical weeds).
Through my searching to find a better way, I stumbled across Dita (Darwin Information Typing Architecture). After reading up on it, I realized this is what I was looking for; a way to create documentation in a standardized way once and have it rendered to fit the needs of the audience.
Much to my dismay, Confluence doesn't have a Dita plugin or support it directly. So this means I would either need to recreate all our documentation into the Dita format or find a way to easily convert it.
Having worked on numerous AEM projects as a Full-stack developer, DevOps Engineer, and AEM Architect, I remembered there is an XML Documentation feature for AEM that should do what I want. But first, I need to export my content from Confluence.
Exporting Confluence Documents
Confluence makes it very easy to export a document or an entire space in multiple formats, from pdfs, MS Word documents, HTML, etc.
In this example, we are going to export the entire space, this will give us all parent pages, child pages, assets, styles, etc.
To export a site in Confluence, go to: Space Settings -> Content Tools -> Export.
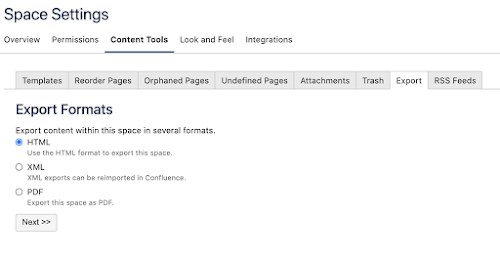
Select 'HTML', and click 'Next'.
Confluence will gather up all our documents and assets, convert the docs to html and package in a zip file for us to download.
After downloading and unpacking our zip archive, examining the content we can see each page is represented in html, contains references to other html pages in our space, but it also contains ids, attributes, and even some elements that are very Confluence specific.
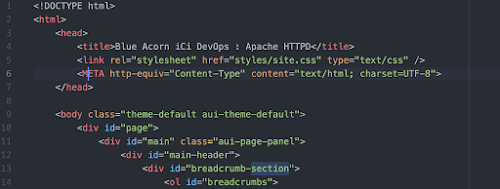
Since we will be using AEM to render the documents, we don't need a lot of the class names, ids, and other bits Confluence added for us. It is also important to note, that our documents need to be in xhtml format before AEM will convert them to Dita.
If we uploaded this document as-is we can expect nothing to happen, this document would not be processed by the workflow. If we simply add the xml header to identify this document as an xhtml document, the workflow would attempt to process the document, but would fail with many errors. So we will need a way to pre-process them to clean them up.
Cleaning Up With Tidy
If you are not familiar with HTML Tidy, it is a great command line utility that can help cleanup and correct most errors in html and xml documents. While we are not expecting that we have any "bad" html, we know we will probably have some empty div elements, Confluence specific items, and since we are processing hundreds of documents we want to ensure they meet the xhtml standard and are as clean as possible without the need to manually go through each one individually correcting errors.
Create a Tidy Config
A Tidy config will help ensure all documents are pre-processed the same way. so that we have a nice uniform output. using your favorite text editor, create a config.txt file that will hold the configuration below.
clean: true
indent: auto
indent-spaces: 4
output-xhtml: true
add-xml-decl: true
add-xml-space: true
drop-empty-paras: true
drop-proprietary-attributes: true
bare: true
word-2000: true
new-blocklevel-tags: section
write-back: true
tidy-mark: false
merge-divs: true
merge-spans: true
enclose-text: true
To read more about what each of these settings does and other options available, check out the API doc page.
Instead of going over every option used above as most should be self-explanatory as to what they do, there are a few that need to be called out.
- output-xhtml - Tells Tidy we want the output in xhtml, the format we need for AEM to process.
- add-xml-decl - Adds the xml declaration to our output document
- new-blocklevel-tags - Confluence adds a 'section' element to all out pages, this element does not conform to xhtml and Tidy will throw an error and refuse to process those docs unless we tell Tidy that it is an acceptable element. NOTE: This is a comma separated list of elements, so if you have others feel free to add them here.
- write-back - write the results back to the original file. By default Tidy will output to stdout. We could create a script to create new files and leave the original alone. But since we have all the originals in the zip file still we will overwrite the ones here.
- tidy-mark - Tidy by default adds metadata to our document indicating that it processed the output. Since we want our output to be as clean as possible for our next step we don't want this extra info.
Processing with Tidy
After we have created our configuration file, we are ready to begin processing the files. We tell tidy to use our configuration file we just created and to process all *.html files in our directory that we unzipped our documents into.
$ tidy -config ~/projects/aem-xml/tidy/config.txt *.html
Depending on how many documents you have and the complexity of them, tidy should complete its task anywhere from a few seconds to a minute or two. If we reopen our document after tidy has processed it we should now see proper xhtml.
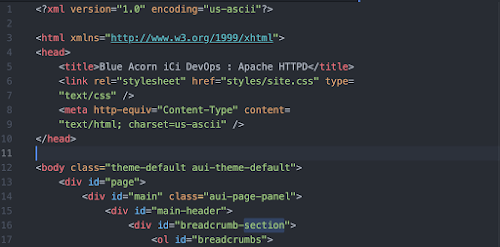
As you can see above, our document has been reformatted, the xml declarations and namespace have been added and if there were any issues with our html it is now resolved for us as well.
Scrolling to the bottom of the page, you can see the html <section> tag(s) are still contained in the output as well as other class names and ids.

If we attempted to import our documents at this point our workflows would process these documents but not create proper Dita Topics from them and would require even more manual work for each document.
The XML Documentation feature for AEM will allow us to apply custom XSLT when processing our documents so that they end up as Dita topics and recognized in AEM as such.
Applying Custom XSLT in AEM
In this next step, we will need access to an AEM Author instance and the XML Documentation feature installed.
After examining our documents we know there are a few tasks we need to perform to clean them up a bit further.
- Remove empty elements
- Remove all class names and ids
- Update our image paths

You will notice there is already a subdirectory html2dita with a h2d_extended.xsl file. When html documents are uploaded to our input folder, in addition to the default processing, this file is also included by default in that process.
Out-of-the-box the /apps/fmdita/config/html2dita/h2d_extended.xsl file just has the xsl declaration and nothing else. We will add our transformations to this file so that everything uploaded is processed the same way.
We will create an identity template to do the majority of work for us. While this is very general and applies to all elements, you should definitely examine your own data first to determine how best to process it.

Images are a little more work to get right, but not overly complicated. We want to ensure we are only modifying internal images and not ones that may be linked from other sites, in other words the src attribute should start with 'attachments'. Also ensure to take note, our XML editor is expecting the element tag for images to be <image href='<path_to_file>'/> and not the xhtml <img src='<path_to_file>'/> element.

Once we have our transforms in place we are ready to upload our data. The XML Documentation feature comes with a few different workflows to process html documents once uploaded.

After uploading we can switch to our XML Editor in AEM and see the new *.dita files in our output folder that we had previously defined. Each file is named 1:1 for its original filename. So if we had uploaded a file 123.html to our input folder, there should now be a 123.dita file in our output folder.
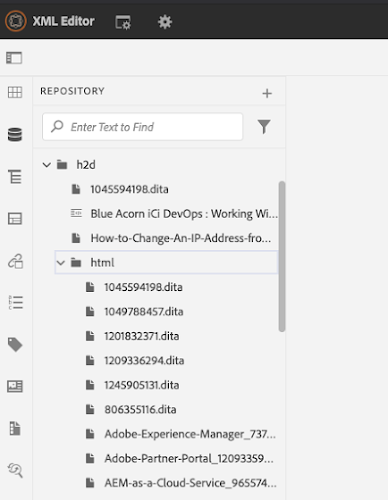
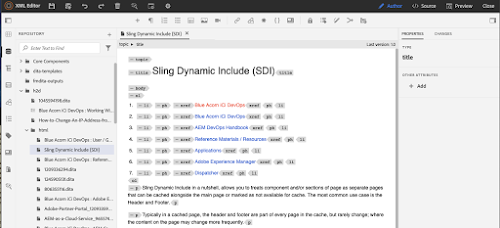
If our cleanup and transforms worked properly, we now can double-click on any of these new *.dita files and see the results of our hard work.
Conclusion
Using a few widely available tools we can successfully migrate documents from Confluence into AEM using the XML Documentation features. Of course this is merely one step in the process of many for performing a true migration and fully using Dita to our benefit. Once the documents are in the Dita format, a Content Author familiar with Dita should go through the documentation looking for areas of reuse, identify audiences, create maps, etc.
If you are serious about working with Dita you should consider using a compliant editor such as Adobe Framemaker. Framemaker can be integrated with AEM to provide a better experience for your team to create Dita documents, collaborate, and publish them in Adobe Experience Manager.
No comments:
Post a Comment