Thursday, September 10, 2020

Convert Confluence Documents to AEM/XML

 Atlassian's Confluence is a great tool for managing and sharing project documentation with your team and its seamless integration into Jira can help put everything into one place.  We've used Confluence and Jira for almost all documentation, from general project docs, to How-Tos, and even New Hire Onboarding. 

Recently I started going through the process of rewriting our training material for DevOps Engineers and found quite a lot of duplication in documentation. For some topics such as 'Git', Adobe Experience Manager, and other topics there were documents created for both front-end and back-end developers as well as Project Managers, QA Engineers, etc.

As I discovered all this duplication and extra work I thought, there has to be a better way, we have too many people creating and maintaining the same thing over and over with only slight variations. My first thought was to move common documents to a shared location and assign owners. This would enable different groups to cross-reference material already documented for their respective teams  The dev team would own and be responsible for creating and maintaining 'git' and code related topics, the devops team would be responsible for topics on AEM setup, configuration, troubleshooting, etc. 

While moving everything around in Confluence and assigning owners may help reduce the number of people updating documents, it doesn't solve the issue of ensuring the documentation fits the audience. Project Managers probably care very little about how to do a git merge and squash those commits, but may need to know general info, such as what git is, how it can be used on a project (without getting too far in to the technical weeds).

Through my searching to find a better way, I stumbled across Dita (Darwin Information Typing Architecture).  After reading up on it, I realized this is what I was looking for; a way to create documentation in a standardized way once and have it rendered to fit the needs of the audience. 

Much to my dismay, Confluence doesn't have a Dita plugin or support it directly. So this means I would either need to recreate all our documentation into the Dita format or find a way to easily convert it.  

Having worked on numerous AEM projects as a Full-stack developer, DevOps Engineer, and AEM Architect, I remembered there is an XML Documentation feature for AEM that should do what I want. But first, I need to export my content from Confluence.


Exporting Confluence Documents

Confluence makes it very easy to export a document or an entire space in multiple formats, from pdfs, MS Word documents, HTML, etc.

In this example, we are going to export the entire space, this will give us all parent pages, child pages, assets, styles, etc.  

To export a site in Confluence, go to: Space Settings -> Content Tools -> Export.


NOTE: While there is an export to xml option, this won't meet our needs. However the export to html option is perfect for what we want as the XML Documentation feature also provides some workflows to convert our html documents into Dita topics.

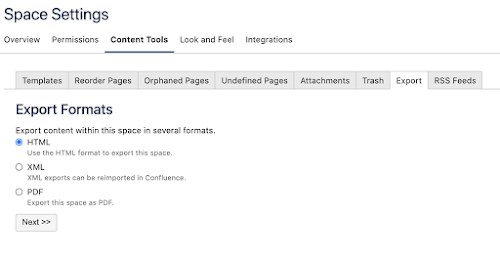
Select 'HTML', and click 'Next'. 

Confluence will gather up all our documents and assets, convert the docs to html and package in a zip file for us to download.


After downloading and unpacking our zip archive, examining the content we can see each page is represented in html, contains references to other html pages in our space, but it also contains ids, attributes, and even some elements that are very Confluence specific. 


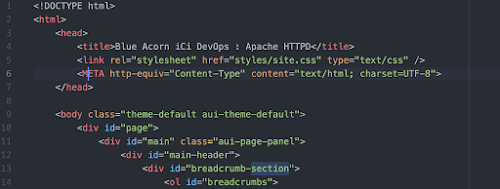
Since we will be using AEM to render the documents, we don't need a lot of the class names, ids, and other bits Confluence added for us. It is also important to note, that our documents need to be in xhtml format before AEM will convert them to Dita. 

If we uploaded this document as-is we can expect nothing to happen,  this document would not be processed by the workflow. If we simply add the xml header to identify this document as an xhtml document, the workflow would attempt to process the document, but would fail with many errors. So we will need a way to pre-process them to clean them up.


Cleaning Up With Tidy

If you are not familiar with HTML Tidy, it is a great command line utility that can help cleanup and correct most errors in html and xml documents. While we are not expecting that we have any "bad" html, we know we will probably have some empty div elements, Confluence specific items, and since we are processing hundreds of documents we want to ensure they meet the xhtml standard and are as clean as possible without the need to manually go through each one individually correcting errors.


Create a Tidy Config

A Tidy config will help ensure all documents are pre-processed the same way. so that we have a nice uniform output. using your favorite text editor, create a config.txt file that will hold the configuration below.

clean: true

indent: auto

indent-spaces: 4

output-xhtml: true

add-xml-decl: true

add-xml-space: true

drop-empty-paras: true

drop-proprietary-attributes: true

bare: true

word-2000: true

new-blocklevel-tags: section

write-back: true

tidy-mark: false

merge-divs: true

merge-spans: true

enclose-text: true

To read more about what each of these settings does and other options available, check out the API doc page.

Instead of going over every option used above as most should be self-explanatory as to what they do, there are a few that need to be called out.

  • output-xhtml - Tells Tidy we want the output in xhtml, the format we need for AEM to process.
  • add-xml-decl - Adds the xml declaration to our output document
  • new-blocklevel-tags - Confluence adds a 'section' element to all out pages, this element does not conform to xhtml and Tidy will throw an error and refuse to process those docs unless we tell Tidy that it is an acceptable element. NOTE: This is a comma separated list of elements, so if you have others feel free to add them here. 
  • write-back - write the results back to the original file. By default Tidy will output to stdout. We could create a script to create new files and leave the original alone. But since we have all the originals in the zip file still we will overwrite the ones here.
  • tidy-mark - Tidy by default adds metadata to our document indicating that it processed the output. Since we want our output to be as clean as possible for our next step we don't want this extra info.
NOTE: I'm using the settings: drop-empty-paras, merge-divs, and merge-spans to account for any occurrences where the original author unknowingly created extra elements, which is very common when using wysiwyg (what you see is what you get) editors. Authors will sometimes hit the enter key a few times to create formatting, unknowing that behind the scenes they are adding extra empty <p> elements.


Processing with Tidy

After we have created our configuration file, we are ready to begin processing the files. We tell tidy to use our configuration file we just created and to process all *.html files in our directory that we unzipped our documents into.

$ tidy -config ~/projects/aem-xml/tidy/config.txt *.html

Depending on how many documents you have and the complexity of them, tidy should complete its task anywhere from a few seconds to a minute or two. If we reopen our document after tidy has processed it we should now see proper xhtml.


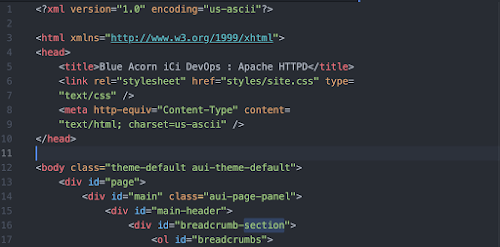
As you can see above, our document has been reformatted, the xml declarations and namespace have been added and if there were any issues with our html it is now resolved for us as well.


Scrolling to the bottom of the page, you can see the html <section> tag(s) are still contained in the output as well as other class names and ids.


You will also notice our images that are contained in the attachments folder have the following markup:


Once our documents are imported and processed in AEM our images will need to be uploaded to the DAM. Which will either change their path or add "/content/dam/" to the path. If we forget this step, good luck trying to reassociate the images back to the original docs.

If we attempted to import our documents at this point our workflows would process these documents but not create proper Dita Topics from them and would require even more manual work for each document. 

The XML Documentation feature for AEM will allow us to apply custom XSLT when processing our documents so that they end up as Dita topics and recognized in AEM as such.


Applying Custom XSLT in AEM

In this next step, we will need access to an AEM Author instance and the XML Documentation feature installed.

After examining our documents we know there are a few tasks we need to perform to clean them up a bit further.

  • Remove empty elements
  • Remove all class names and ids
  • Update our image paths
First we want to upload all the assets in the attachments folder to the dam. We will put these in "/content/dam/attachments/...". Take a quick peek in the images directory that was exported to determine if there is anything we need and upload as appropriate.  If not, you may also need to update/remove those elements in our documents when we import them.

Open crxde, http://<host:port>/crx/de/index.jsp, and log in as an administrator. We will need to create an overlay so that we can specify our input and output folders for the workflow.

Copy the /libs/fmdita/config/h2d_io.xml file to /apps/fmdita/config/h2d_io.xml, and update the inputDir and outputDir elements to the path(s) you will be using.


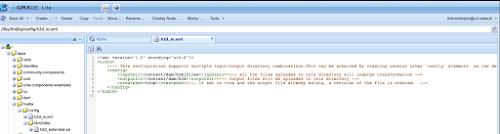
You will notice there is already a subdirectory html2dita with a h2d_extended.xsl file.  When html documents are uploaded to our input folder, in addition to the default processing, this file is also included by default in that process. 

Out-of-the-box the /apps/fmdita/config/html2dita/h2d_extended.xsl file just has the xsl declaration and nothing else. We will add our transformations to this file so that everything uploaded is processed the same way.

We will create an identity template to do the majority of work for us. While this is very general and applies to all elements, you should definitely examine your own data first to determine how best to process it.


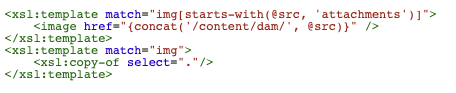
Images are a little more work to get right, but not overly complicated. We want to ensure we are only modifying internal images and not ones that may be linked from other sites, in other words the src attribute should start with 'attachments'. Also ensure to take note, our XML editor is expecting the element tag for images to be <image href='<path_to_file>'/> and not the xhtml <img src='<path_to_file>'/> element.


Once we have our transforms in place we are ready to upload our data. The XML Documentation feature comes with a few different workflows to process html documents once uploaded. 


This will allow us to either upload our pages individually one by one, or we can repackage them into a zip file and upload that zip file to our input folder. Since we will be uploading a few hundred pages the zip option will be the one we want to go with.

If we wanted to merely test our process, we could pick one or two html files and upload just those. Watching the logs and checking the output folder will give us an indication if everything is working correctly or if there are additional transforms or cleanup that will be required.

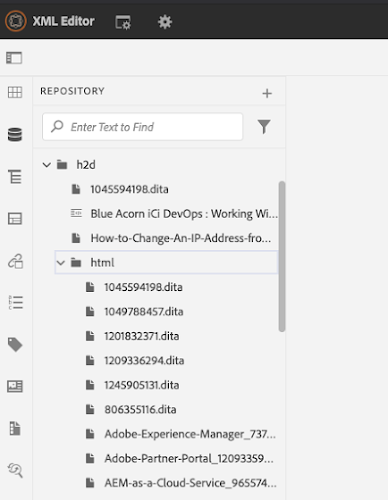
After uploading we can switch to our XML Editor in AEM and see the new *.dita files in our output folder that we had previously defined. Each file is named 1:1 for its original filename. So if we had uploaded a file 123.html to our input folder, there should now be a 123.dita file in our output folder.


If our cleanup and transforms worked properly, we now can double-click on any of these new *.dita files and see the results of our hard work.


Conclusion

Using a few widely available tools we can successfully migrate documents from Confluence into AEM using the XML Documentation features. Of course this is merely one step in the process of many for performing a true migration and fully using Dita to our benefit. Once the documents are in the Dita format, a Content Author familiar with Dita should go through the documentation looking for areas of reuse, identify audiences, create maps, etc.

If you are serious about working with Dita you should consider using a compliant editor such as Adobe Framemaker. Framemaker can be integrated with AEM to provide a better experience for your team to create Dita documents, collaborate, and publish them in Adobe Experience Manager.

Tuesday, September 1, 2020

Checking Links with Scrapy

 Whether you are supporting an AEM project or any other web project one of the regular tasks someone on the team should perform is to check all the links on the site before go-live so the authoring team can correct them.

If we only have a few pages this can be a pretty easy task for someone to manually perform, but for large sites with hundreds or thousands of pages can be a very tall task even for the whole team to perform. One strategy that is commonly used is to take all known URLs and/or redirects, put them in a file and a quick curl script to iterate over them; but what about unknown links that may have been created or links returning error codes.

 Luckily we can use the open-source scrapy framework to create a custom crawler to check all the links for us and output a report that we can then give to the authoring team. Scrapy is a Python framework that provides both command line utilities with prebuilt spiders and the ability to customize the spiders to our specific needs. While the framework is originally written to scrape data from a website we can also use it for our purposes as well.


Before we get started you will need a system with Python3 and PyPI (pip) installed to use as our development environment.

Install Scrapy using pip

$ pip install scrapy


Normally at this step you would create a folder for all our project files, which you can certainly do. For this project we will use the scrapy cmd line util to create our initial project structure for us.

$ scrapy startproject linkCrawler

 The command above, scrapy will create the initial project 'linkCrawler' and all necessary files to get started. If we take a look at the structure it should look like the following:

$ tree .

.

├── linkCrawler

│   ├── __init__.py

│   ├── items.py

│   ├── middlewares.py

│   ├── pipelines.py

│   ├── settings.py

│   └── spiders

│       └── __init__.py

└── scrapy.cfg


2 directories, 7 files


Next, we need to create our first spider. Again, we will use the scrapy utility to generate our spider for us and we will customize it to our needs later.

$ cd linkCrawler


$ scrapy genspider -t crawl example example.com


Created spider 'example' using template 'crawl' in module:

  linkCrawler.spiders.example


Let's break down the command above:

scrapy genspider - tells scrapy to generate a spider for us
-t crawl - tells scrapy to use the 'crawl' template when creating the spider
example - our spider's name.
example.com - The domain our spider will crawl


Let's take a look at our project structure. We can see scrapy added our spider example.py.

$ tree .

.

├── linkCrawler

│   ├── __init__.py

│   ├── items.py

│   ├── middlewares.py

│   ├── pipelines.py

│   ├── settings.py

│   └── spiders

│       ├── __init__.py

│       └── example.py

└── scrapy.cfg


2 directories, 11 files


The two files we will concentrate on is the 'settings.py' and 'example.py' files.

Since we are crawling our own site and we want to check ALL the links on our site, we want to tell our spider to disregard the rules in the robots.txt file. Normally we would want to obey by the rules in the robots.txt file especially if we do not own the site. 

We can turn this feature off  by opening the settings.py file and looking for the following line and changing to 'False'.

# Obey robots.txt rules

ROBOTSTXT_OBEY = False


Save the file. 

Next we will modify our spider to check for bad links and create a report.

Opening the example.py file  we can see the basic structure is already created for us.

import scrapy

from scrapy.linkextractors import LinkExtractor

from scrapy.spiders import CrawlSpider, Rule


class ExampleSpider(CrawlSpider):

    name = 'example'

    allowed_domains = ['example.com']

    start_urls = ['http://example.com/']


    rules = (

        Rule(LinkExtractor(allow=r'Items/'), callback='parse_item', follow=True),

    )


    def parse_item(self, response):

        item = {}

        #item['domain_id'] = response.xpath('//input[@id="sid"]/@value').get()

        #item['name'] = response.xpath('//div[@id="name"]').get()

        #item['description'] = response.xpath('//div[@id="description"]').get()

        return item


First lets add an object to hold our report data items. 

class BadLinks(Item):

    referer = Field()

    url = Field()

    status = Field()

    dispatcher = Field()


So that our report is useful we want to capture a few data items:
  • Referer: What page were we on when the link was followed
  • URL: What is the link that was followed
  • Status: The HTTP status code returned when we crawled the link
  • Dispatcher: The value of the 'X-Dispatcher' header. This will tell us what dispatcher/publish pair had an issue so that we can investigate if there is a problem with that pair.

In our ExampleSpider class,  we will add support for non HTTP 200 codes.

class ExampleSpider(CrawlSpider):

    name = 'example'

    allowed_domains = ['example.com']

    start_urls = ['http://example.com/']

    handle_httpstatus_list = [404,410,301,500]


Here is an explanation of what is going on in these few lines:
  • name: This is the name of this spider and must be unique.
  • allowed_domains: List of the domains we want the spider to crawl. We could include any subdomains or other domains linked to this site that we own and want to check.
  • start_urls: List of urls where we want crawling to begin at. Since we want the entire site we will leave this at the root of the site.
  • handle_httpstatus_list: List of http status codes outside of the 200-300 range that we want this spider to handle.
Lets add a few rules telling our spider what it should crawl.

rules = [

    Rule(

      LinkExtractor(allow_domains=allowed_domains, deny=('/media/*'), unique=('Yes')),

      callback='parse_item',

      follow=True

    ),

    Rule(

      LinkExtractor(allow=(''),unique=('Yes')),

      callback='parse_item',

      follow=False

    )

]


In the above section of code we have two Rule objects using the LinkExtractor object. 

The first rule we specify the allow_domains to match our variable, we add a deny for the /media/ section of the site, and that we only wish to capture unique values.

The second Rule object allows all links to be identified but not followed. This will cover our external links in the output but we won't crawl those sites.

In the callback we call 'parse_items' to identify how the link is to be handled. So let's modify that method to record the data for bad links.

 def parse_item(self, response):

        report_if = [404,500]

        if response.status in report_if:

            item = BadLinks()

            item['referer'] = response.request.headers.get('Referer', None)

            item['status'] = response.status

            item['response'] = response.url

            item['dispatcher'] = response.headers.get('X-Dispatcher', None)

            yield item

        yield None


In the section above we check if the response status code is a 404 or 500, if it is we parse the values we want for our report.

Our complete spider should now look like the following:

# -*- coding: utf-8 -*-

import scrapy

from scrapy.linkextractors import LinkExtractor

from scrapy.spiders import CrawlSpider, Rule

from scrapy.item import Item, Field


class BadLinks(Item):

    referer = Field()

    response = Field()

    status = Field()

    dispatcher = Field()


class ExampleSpider(CrawlSpider):

    name = 'example'

    allowed_domains = ['example.com']

    start_urls = ['http://example.com/']

    handle_httpstatus_list = [404,410,301,500]


    rules = [

        Rule(

           LinkExtractor(allow_domains=allowed_domains, deny=('/media/*'), unique=('Yes')),

           callback='parse_item',

           follow=True

        ),

        Rule(

           LinkExtractor(allow=(''),unique=('Yes')),

           callback='parse_item',

           follow=False

        )

    ]


   def parse_item(self, response):

        report_if = [404,500]

        if response.status in report_if:

            item = CrawlItems()

            item['referer'] = response.request.headers.get('Referer', None)

            item['status'] = response.status

            item['response'] = response.url

            item['dispatcher'] = response.headers.get('X-Dispatcher', None)

            yield item

        yield None


We are now ready to run our spider. Save the file and start our spider with the following command:

$ scrapy crawl example -o report.csv


While the spider is running you will see debug info sent to stdout and any links resulting in a 404 or 500 will be captured in our report.

From here we could add additional spiders to this project to handle checking 301 redirects, warm cache, or scrape data from our pages.

Saturday, June 13, 2020

Automating Sandbox Environments - Part I

This series is based on an internal project I started last year.  Working on multiple projects at the same time usually means my time is very valuable, so I'm always looking to improve, automate tasks, and empower our Team.


The Problem

Periodically I get asked to provision an AEM environment to showcase our work to existing and potential partners and clients.  Of course with any environment you provision, those that have access to it don't want you to remove it,  even when the project is over, just in case they need it for 'something'. 

Once word about this environment gets out, other teams, such as Analytics, UX/UI, and Marketing may also want to use the environment as well. What ends up happening is there really is no one 'managing' the application, you have a single set of servers trying to fulfill different needs for different teams.

 Over time you find the original owner of the environment is no longer with the company, code and content has become stale and the application may be starting to throw errors.


Acceptance Criteria

Analyzing the problem above we find that there are actually several problems we need to solve for.

  1. Each team should have their own environment that is specific to their use-case.
    Use-Case: If the Frontend dev team wants to showcase a SPA, that work should not conflict with anything the Data Engineering team wants to show for integrating Data Layers.

  2. Each team should be able to have more than one environment.
    Use-case: The team may be showcasing a particular feature or implementation and want to give the customer limited access to test the feature.

  3. Environments should be repeatable and have a short shelf-life.
    Use-case: We don't want to have someone playing 'cleanup' at the end of every demo in order to get it prepared for the next demo. In addition, if the servers aren't being used we don't want to pay for their up-time.

  4. Provisioning an environment should be quick.
    Use-case: Sometimes we will have a request for an environment months before it is needed, other times we may be alerted hours prior to a meeting with a potential partner that they wish to see certain features.

  5. Our teams should be empowered.
    Use-case: While we want to be able to place strict controls over what is provisioned and how it is provisioned, our teams should be empowered to 'self-serve' a bit and dictate what that environment is used for.

  6. We should be able to provision different versions of the application.
    Use-case: While most demos will always be with the latest and greatest, sometimes a client wants to see things on the same version they have. In addition, we don't want to spend a lot of time performing upgrades.

  7. Employees should be able to log in to the application right away with their corporate IDs.
    Use-case: We don't want people sharing an account, which is a security issue, and we don't want someone to have to manually create and manage user accounts and permissions in the application

  8. We don't want to be locked in to platform or provider.
    Use-case: With very little work, we should be able to adapt our solution to be applied to AWS, Azure, VMWare, or any other provider.

The Solution

While you may already be thinking of different possibilities, such as Dockerfiles, AMIs,  Cloud Formation, Ansible, etc. Alone, each possible solution has it's pros and cons and may not meet all of our criteria.


For our solution we will be using several technologies together. Initially we will start with provisioning to Amazon Web Services. Later we may add support to provision to Azure as well.

We will use Packer to create images; Ansible to customize the images; Terraform to provision the resources on AWS, and Make to help tie it all together and make the commands more friendly. Lastly, we will use Docker to create a Dockerfile of our control machine so that we don't need a dedicated resource.

NOTE: This series does not aim to teach these technologies, you should already be familiar with them.

Requirements:

  • An AWS account with an IAM user that has privileges to provision EC2 instances, create AMIs and other resources.
  • GitLab or GitHub account for our project, but also access to other application project repositories that we will be deploying.
  • Artifactory or other binary repository to stage content packages, but also to maintain the different application versions
  • A VM or machine that will be running our automated tools. This can be a dedicated VM for this purpose, in our example we will create a Docker container for this vm.

    The machine/vm should have the following installed:

In the next part of our series we will set up our vm workspace, create our project structure, and dive right in. Each part of this series will cover implementing a different piece of the puzzle.  

While we are working on these pieces we could go ahead and get our teams thinking about what content and configurations they may want installed by default.


AEM Dispatcher - Troubleshooting Filters

If you have worked with Adobe Experience Manager long enough, eventually you will find yourself trying to figure out why a page, asset, or other call is returning a 404 at the dispatcher but working fine on Author and Publish instances.

The most common problem is a dispatcher filter blocking the call at the webserver and not allowing the traffic to make it to the Publish instance(s).  

What is a Dispatcher Filter?

Without getting too technical, dispatcher filters can be thought of as ACLs applied at the webserver. 

The main purpose is to provide an extra layer of security by preventing public access to the protected areas of the Author and Publish instances.  But don't these areas require credentials with proper permissions in AEM? Yes, but with properly written dispatcher filters, you don't even allow users to get prompted for a password, thus adding an extra layer between the public and your AEM instance(s).


Dispatcher Log

By default, the dispatcher is set to 'info' and logs all output to the dispatcher.log file located typically with your web server log files.

When the dispatcher log level is set to 'debug', it will print to the log file that the request was rejected due to a filter rule.

[Thu Jun 11 21:35:55 2020] [D] [pid 66692] Filter rejects: 
GET /content/dam/<project_folder>/AdobeStock_edited.jpg.transform/2x1x/image.jpg HTTP/1.1


But which one?

If we change the dispatcher log level to 'trace' or loglevel '4' and restart the dispatcher, the logs will now tell us more about the request and the specific filter that denied that request. 

[Thu Jun 11 21:35:55 2020] [T] [pid 66692] 
Filter rule entry /0001 blocked 'GET /content/dam/<project_folder>/AdobeStock_edited.jpg.transform/2x1x/image.jpg HTTP/1.1'


Looking at the actual request and the filter that rejected that request, you should now be able to update or create a new rule to allow that call and other calls matching it.

Saturday, May 23, 2020

Inject Version in Maven Build

When it comes to code versioning and deployments, it is always a good idea at the very beginning of the project to come up with a release strategy and branching/tagging nomenclature that works well for the team.  This makes it easier to enforce good habits throughout the life of the project.

On most if not all of our projects we use git for code versioning and Jira for project management; to help keep tabs on what features are in which release, we use feature branches where the name of the branch is also the story id in Jira. For example, if you are assigned Jira story 'ABC-1234', then that is also the name of your feature branch.

This approach makes it not only easy to track which features are in a given  release, but helps those doing a code review and performing QA tasks understand what the given branch should do and understand better how to test it.

When it comes to releases, I typically prefer to go with a release branch strategy versus tags. For example release candidate 1.0.12 would be branch 'RC-1.0.12'.  The format is pretty simple, this release branch can then be added to your Jira stories to better keep tabs on what features are in each given release. While it may just seem like a bit of extra work, at some point during the lifecycle of the project someone will have a need to find out when a certain feature was introduced into the codebase, who requested the change, and who coded it.

Ok, so now that we have laid out the basics of our branch names and their meanings, this brings us to actually versioning our maven builds. There are a number of different ways to do this, one I see a lot is Release Managers manually updating the version number in the pom.xml files. In a multi-module project this can be tedious. Of course they then usually commit the update back to the git repository, then build the code.

Unless there is a strong need to have the version number updated in the release branch, there is an easier way by leveraging the Maven versions plugin to do the work for us.  To execute a maven build and set the version we would do something like the following:

mvn versions:set -DnewVersion=1.0.12 clean install
Pretty easy, but if the release branch already contains the version number, why type it in? Manually typing in version numbers could lead to human error and inconsistencies.

We can further automate this by writing a short script to parse the version number out of the branch name.

Each build tool uses different variables to make the branch name available to our script. If you are using Jenkins you can use the ${GIT_BRANCH} variable. If you are using Bamboo, you can use the ${bamboo.planRepository.1.branchName} variable to get the branch name.

Now that we have a way to get the branch name, we need to write our script to extract just the version number, store the result in a variable that can then be passed to our maven command.

While there are a number of ways to do it, for this example we will use sed in our script. Notice in the script below everything after the equals sign is enclosed with a backtick. We do this so that when the command is interpreted the results are written to the variable 'version'. We can then use the version variable in the maven command.

version=`echo ${GIT_BRANCH} | sed -e 's/.*-\([[:digit:]]\{1,\}\(\.[[:digit:]]\{1,\}\)\{1,\}\)/\1/'
mvn versions:set -DnewVersion=${version} clean install
Now we are all set, when we run our build job, it will automatically update the version in the pom.xml files based on the version number in our branch we built it against.

Using ssh config

If you have ever used ssh before, you know it is pretty straightforward to connect to other servers and virtual machines,  ssh ip_or_hostname. You may even type it without even thinking about it. As your infrastructure grows and maybe some moves to the cloud  you may begin to need to also add a username and/or a different Identity file or private key.

 ssh -i /path/to/identity/file username@ip_or_hostname

Still pretty straightforward, it is a bit more to type out which can be annoying and slow you down when you are in a hurry.  We could simplify this a bit by adding an Alias for this command. Then we would just type our Alias and let the system handle the rest. Then all we need to remember is our Alias that we created.

What happens when the number of virtual machines you are supporting increases dramatically. What if many of those servers are for production and lower environments hosted by multiple clients. Add to that multiple git repositories for those clients as well. You can very quickly end up with quite the number of Identity files and keys to manage. If we are creating Alias commands for each of those virtual machines you will have to come up with a snappy way to remember all those Alias commands.


An alternative would be to take a few moments and add the entries to a ssh config file on the machine we are connecting from. By default OpenSSH doesn't create a config file iin your profile or home directory, but we can manually add it there.

Using your favorite text editor, create a file called 'config' in your .ssh directory. By default OpenSSH will automatically look for this file

vi ~/.ssh/config

Now we are ready to add our entries using the following format for each entry:

# This is a comment line
Host clientADev
HostName devserver.example.com 
User myUserID 
IdentityFile ~/.ssh/clientA-dev.pem
Save the file, and now we can ssh using the following command:

ssh clientADev

OpenSSH will find that host in our config file and use the HostName, User, and IdentityFile we specified to make the connection.

But what if we have a dev environment with more than 1 server and we use the same credentials for all of them. We can specify multiple entries by hostname or ip in the Host line to account for this.


# This is a comment line
Host 123.345.789 789.475.123  67.234.123
User myUserID 
IdentityFile ~/.ssh/clientA-dev.pem

Now when we ssh to any of the hosts listed OpenSSH will automatically use the proper credentials, and we no longer need to type long commands or remember which creds go to which server(s).

There are many other options we can add to the config file to better control and configure our ssh client. For more on that you may want to review the man pages on this topic.